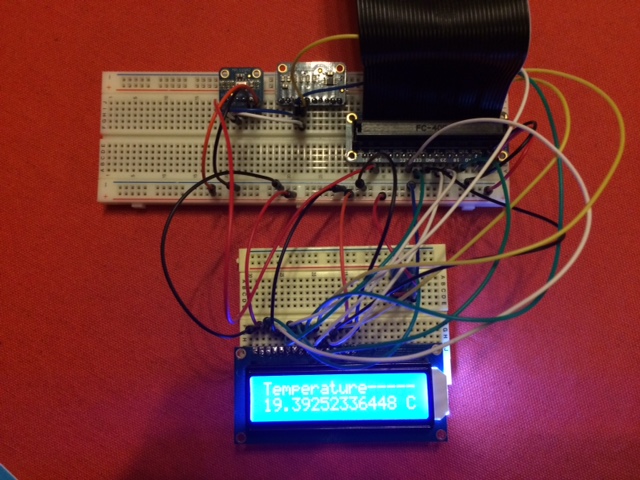
My first developments are ready. In short I created a java application that has to be installed on the Raspberry Pi which will read temperature and pressure from an Adafruit sensor (mpl1115a2) and showing reading on a small 16×2 LCD screen (Adafruit). As said in my previous post, I only used java technology and Pi4J. But in fact this is not 100% correct because behind the scenes, Pi4J is using a library called Wiring Pi. The wiring was simple once you know how to connect the pins to the LCD screen.
- First read about the installation steps for using and installing Pi4J
- To connect the LCD to the RP the following site was very useful : http://wiringpi.com/dev-lib/lcd-library/
- For the use of the barometric sensor (mpl115a2) I would like to refer to the site : Adafruit mpl115a2
- Information on LCD shield kit w/ 16×2 Character Display
- I did not use the shield. I did not manage to get it working using Java and the Pi4J api. I am sure it is possible but the complexity lays in the fact that the shield has an I2C expander and that made me give up in a first stage. I did get it working compiling one of the C Examples from the Wiring Pi site but my goal was to get it working via Java. I know, I am stubborn.
Components used
- breadboard (big enough)
- Raspberry Pi B+
- ADS1115
- mpl115a2
- LCD shield kit w/ 16×2 Character Display
- lots of wires
Tools used :
- Intellij
- Git
- SourceTree
Important notice:
For the RP to be able to read from the sensor, an analog to digital (ADC) converter is necessary since the sensor only returns analog information. I have chosen for the I2C protocol so I needed an ADC which supported this protocol. For this project I used the ADS1115. It took me a while to understand but that was more related to the fact that I have no electronics background. But anyway, Google showed me the way to some interesting sites to get my knowledge in this context up to scale.
Lessons learned
- before using the sensor and lcd, make sure you have done all the soldering necessary. I made the mistake of not doing this in the beginning causing malfunction of the LCD but after soldering, all issues disappeared.
- Read the datasheets carefully.
- Doublecheck the wirings
- make sure you have a big enough breadboard
The source code is available on Github: https://github.com/jbyle/PI4JDevelopment.git
Comments of any kind are well appreciated, also source improvements.
I’m really loving the theme/design off your weblog.
Do you eve run into anyy web browser compatibility problems?
A handful of my blog visitors have complained about my ite not working correctly in Explorer but llooks great
in Chrome. Do you have anny solutions to help fix tjis problem?
Hey hello,
I am not aware of any problems but I ust admit I mostly use FireFox and Chrome. I bought a Theme which I am using.
What kind of problems do you have ?